Swapping tokens on a decentralized exchange feels intimidating when you’re doing it for the first time. You’re about to interact with blockchain technology directly, without the safety net of customer support or a “forgot password” button. But thousands of people complete their first swap every day, and most of them figure it out without losing money or making expensive mistakes. This guide walks you through every single step, from setting up your wallet to confirming your transaction, so you can swap tokens confidently and safely.
Swapping tokens on a DEX requires a self-custody wallet, native blockchain tokens for gas fees, and understanding of slippage tolerance. The process involves connecting your wallet, selecting tokens, reviewing transaction details, and confirming on-chain. While DEXs offer permissionless access and better privacy than centralized exchanges, they also require you to manage security and transaction costs yourself. Start with small amounts until comfortable.
What you need before making your first swap
You cannot swap tokens on a DEX without the right setup.
First, you need a self-custody wallet. This is different from an account on Coinbase or Binance. With a self-custody wallet, you control your private keys. Popular options include MetaMask, Trust Wallet, and Rainbow Wallet. If you haven’t set one up yet, understanding how to choose between hot wallets and cold wallets for your crypto will help you pick the right type for your needs.
Second, you need cryptocurrency already in your wallet. You cannot buy crypto directly on most DEXs. You’ll need to purchase tokens on a centralized exchange first, then transfer them to your wallet. Make sure you’re sending tokens to the correct blockchain address.
Third, you need native tokens for gas fees. If you’re swapping on Ethereum, you need ETH. On Binance Smart Chain, you need BNB. On Polygon, you need MATIC. These fees pay miners or validators to process your transaction. Without them, your swap won’t go through.
Fourth, understand that you’re responsible for everything. There’s no customer service to call if something goes wrong. There’s no password reset. If you lose your seed phrase, your funds are gone forever. What happens if you lose your seed phrase explains the reality of this responsibility.
Understanding what a DEX actually does
A decentralized exchange operates fundamentally differently than traditional exchanges.
DEXs use smart contracts instead of company servers. When you swap tokens, you’re interacting directly with code running on a blockchain. No company holds your funds during the trade. No order book matches buyers with sellers. Instead, automated market makers explained power most modern DEXs through liquidity pools.
This creates several important differences. You maintain custody of your tokens until the exact moment they swap. You don’t need to create an account or verify your identity. You can access any token listed on the DEX, not just the ones a company decides to support. Why is DeFi called permissionless explores this fundamental characteristic.
But this also means you face different risks. Smart contract bugs can drain funds. Malicious tokens can steal your money. Transaction errors are permanent. Understanding these tradeoffs matters before you start swapping.
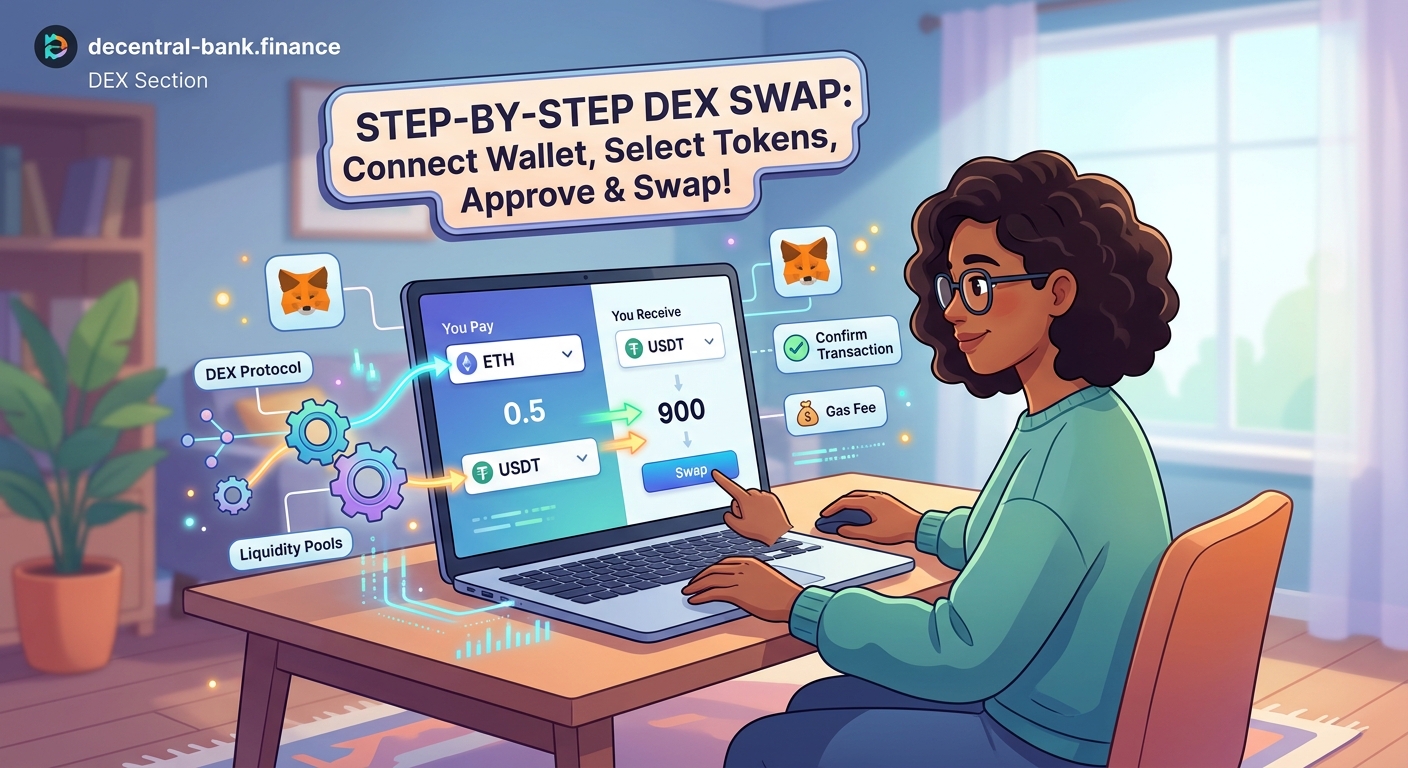
Step-by-step walkthrough for your first token swap
Here’s exactly how to complete a token swap on a DEX.
-
Choose your DEX platform. Popular options include Uniswap (Ethereum), PancakeSwap (BSC), and Trader Joe (Avalanche). Each operates on a specific blockchain. Make sure you pick one that supports the tokens you want to swap. 5 best decentralized exchanges for beginners in 2026 compares the top platforms.
-
Connect your wallet. Visit the DEX website and click “Connect Wallet.” A popup will ask which wallet you’re using. Select yours, then approve the connection in your wallet app. This doesn’t give the DEX permission to move your funds. It just lets the website see your address and token balances.
-
Select your input token. This is what you’re trading away. Click the token selector at the top of the swap interface. Either search for your token by name or paste its contract address. Make sure you’re selecting the real token, not a fake version with a similar name.
-
Select your output token. This is what you’re receiving. Use the token selector at the bottom of the swap interface. Again, verify you’re choosing the legitimate token. Scammers create fake tokens with identical names to trick users.
-
Enter the amount. Type how much of the input token you want to swap. The interface will automatically calculate how much of the output token you’ll receive. This number updates in real-time as market prices change.
-
Check the exchange rate. Look at the rate displayed between the two token amounts. Does it seem reasonable compared to other exchanges? If it looks suspiciously good or bad, something might be wrong.
-
Review slippage tolerance. This setting determines how much the price can move between when you submit your transaction and when it executes. Most DEXs default to 0.5% or 1%. For volatile tokens, you might need higher slippage. For stablecoins, you want lower. What is slippage and why does it eat your profits explains this concept in detail.
-
Approve the token (first time only). If this is your first time swapping this specific token, you’ll need to approve it first. Click “Approve” and confirm the transaction in your wallet. This costs gas fees but only needs to happen once per token. Understanding what happens when you approve a smart contract helps you manage these permissions safely.
-
Execute the swap. Click “Swap” and carefully review the transaction details in your wallet popup. Check the gas fee, the tokens involved, and the amounts. If everything looks correct, confirm the transaction.
-
Wait for confirmation. Your transaction is now processing on the blockchain. This typically takes 15 seconds to a few minutes depending on the network. You can watch the status in your wallet or by clicking the transaction hash to view it on a block explorer.
-
Verify the tokens arrived. Once confirmed, check your wallet balance. The output tokens should now appear. The input tokens should be gone. If you don’t see the new tokens immediately, you might need to manually add them to your wallet’s token list using the contract address.
Common mistakes that cost beginners money
New users make predictable errors when learning how to swap tokens on dex platforms.
Insufficient gas fees. Setting gas too low causes your transaction to fail, but you still lose the gas fee you did pay. Always check current network conditions and use recommended gas settings. Why do DeFi transactions cost gas fees breaks down this cost structure.
Wrong network selection. Sending Ethereum tokens to your Binance Smart Chain address loses them permanently. Always verify you’re on the correct network before initiating any transaction.
Fake token selection. Scammers create tokens with names identical to popular projects. Always verify the contract address against official sources before swapping.
Ignoring slippage warnings. When a DEX warns about high price impact, listen. You might be trading in a pool with low liquidity, which means you’ll get a terrible rate.
Approving unlimited amounts. Some DEXs ask for unlimited token approval by default. This lets them move any amount of that token from your wallet forever. Consider approving only the specific amount you’re swapping.
Not checking transaction details. Always review what your wallet shows before confirming. The DEX website might display one thing, but the actual transaction could do something else if you’re on a phishing site.
Here’s a comparison table of common mistakes and how to avoid them:
| Mistake | Why It Happens | How to Prevent It |
|---|---|---|
| Insufficient gas | Using outdated fee estimates | Check current network congestion before swapping |
| Wrong network | Confusion between similar-looking chains | Double-check network name in wallet before confirming |
| Fake tokens | Scammers exploit similar names | Verify contract address on official project website |
| High slippage loss | Trading in low-liquidity pools | Start with popular token pairs and small amounts |
| Unlimited approvals | Accepting default settings | Manually set approval amounts or use revoke tools later |
| Phishing sites | Clicking malicious search ads | Bookmark legitimate DEX URLs and only use those |
Security practices every DEX user should follow
Protecting yourself requires consistent habits.
- Bookmark legitimate DEX websites. Never access a DEX through search engine results or social media links. Phishing sites often appear at the top of search results through paid ads.
- Use a dedicated browser for DeFi. Some users keep a separate browser profile or even a different browser entirely for crypto activities. This reduces exposure to malicious browser extensions.
- Start with small test transactions. Your first swap should involve a tiny amount. Once you confirm everything works correctly, you can swap larger amounts with confidence.
- Revoke old token approvals regularly. Tools like Revoke.cash let you remove permissions you’ve granted to smart contracts. What are token approval exploits explains why this matters.
- Keep your seed phrase offline. Write it on paper or metal, never in a digital file. How to safely store your seed phrase without digital backups provides specific storage methods.
- Verify token contracts independently. Before swapping any token, check its contract address on the project’s official website or Twitter account, not just what the DEX shows you.
“The biggest security risk in DeFi isn’t smart contract hacks. It’s user error. Double-checking every detail before confirming a transaction prevents 90% of losses.” – Security researcher at a leading blockchain auditing firm
Understanding transaction costs and timing
Gas fees confuse most beginners.
The cost to swap tokens varies dramatically based on network congestion. On Ethereum, swaps might cost $5 during quiet periods or $50+ during busy times. On alternative chains like Polygon or Arbitrum, fees typically stay under $1.
Transaction speed also varies. Ethereum transactions usually confirm in 15-30 seconds. During extreme congestion, they might take several minutes. Some networks like Polygon confirm in just a few seconds.
You can pay more gas to speed up your transaction, but this only makes sense for time-sensitive trades. For most swaps, standard gas settings work fine.
Failed transactions still cost gas. If your transaction runs out of gas or gets reverted for any reason, you lose the gas fee you paid. This is why proper setup matters before attempting a swap.
Choosing the right tokens to swap
Not all tokens are safe to trade.
Legitimate projects have verified contract addresses, active communities, and transparent teams. Before swapping any token, research it thoroughly. Check if it has a real website, active social media, and genuine user engagement.
Watch out for these red flags:
– Anonymous teams with no public presence
– Promises of guaranteed returns
– Tokens that won’t let you sell after buying
– Liquidity pools with tiny amounts locked
– Contract code that hasn’t been audited
How to spot a rug pull before you lose your crypto covers these warning signs in greater depth.
Stablecoins make good practice tokens for your first swap because their prices don’t fluctuate much. USDT vs USDC vs DAI compares the most popular options.
What happens after your first successful swap
Completing your first token swap opens new possibilities in DeFi.
You can now access any token available on decentralized exchanges. You’re not limited to what centralized exchanges decide to list. You can participate in new token launches, swap between obscure pairs, or access tokens from emerging blockchain projects.
You might want to explore providing liquidity next. How to provide liquidity on Uniswap without losing money explains this advanced strategy. Or you could look into staking tokens you’ve swapped for. How to start staking crypto walks through that process.
Understanding how does DeFi actually work without banks or middlemen gives you the conceptual foundation to use these protocols confidently.
Troubleshooting common swap problems
Things go wrong sometimes. Here’s how to fix them.
Transaction pending for hours: Check the gas fee you paid. If it’s too low, your transaction might never confirm. You can try speeding it up by paying additional gas, or you can cancel it and resubmit with higher gas.
Swap button is grayed out: You probably don’t have enough native tokens for gas fees. Add some ETH, BNB, or whatever the network requires.
Transaction failed but gas was charged: Your transaction was attempted but reverted. Common causes include insufficient slippage tolerance, token approval issues, or the token having special transfer restrictions.
Tokens not showing in wallet: You need to manually add the token contract address to your wallet. Find the contract address on the DEX or a block explorer, then use your wallet’s “Add Token” feature.
Price impact warning: You’re trying to swap too much relative to the pool’s liquidity. Either reduce your swap amount or split it into multiple smaller transactions.
When to use a DEX versus a centralized exchange
DEXs aren’t always the best choice.
Use a DEX when you need access to tokens not listed on centralized exchanges. Use them when you want to maintain complete privacy and control over your funds. Use them when you’re participating in DeFi protocols that require direct wallet interaction.
Use a centralized exchange when you’re buying crypto with fiat currency. Use them when you want insurance against hacks or mistakes. Use them when you’re trading large amounts and need deeper liquidity. Traditional finance vs DeFi explores these tradeoffs comprehensively.
Many people use both. They keep most funds on centralized exchanges for security and liquidity, then transfer small amounts to DEXs when they need to access specific tokens or DeFi protocols.
Building confidence with practice swaps
Your first swap should be tiny.
Swap $10 or $20 worth of tokens just to learn the process. Watch how the interface works. See how long transactions take. Understand what gas fees actually cost on your chosen network.
After a few successful small swaps, gradually increase your amounts. But never swap more than you can afford to lose completely. DeFi protocols can get hacked. Smart contracts can have bugs. Mistakes can happen.
Getting started with DeFi provides a broader framework for expanding your DeFi knowledge safely.
Keep learning about the risks you’re taking. Why DeFi yields are high and what risks you’re actually taking explains the relationship between returns and risk in decentralized finance.
Making your first swap happen safely
You now have everything you need to complete your first token swap on a DEX.
Start by setting up a self-custody wallet and funding it with a small amount of crypto and native tokens for gas. Choose a reputable DEX that operates on your preferred blockchain. Connect your wallet, select your tokens carefully, verify all transaction details, and confirm your swap.
Take your time with each step. Double-check addresses, amounts, and network settings. There’s no rush, and mistakes are permanent in DeFi. But once you’ve completed a few swaps successfully, the process becomes natural. You’ll have joined the growing community of people who interact directly with blockchain technology, without asking permission from any centralized authority.
Your first swap is just the beginning of what’s possible in decentralized finance.